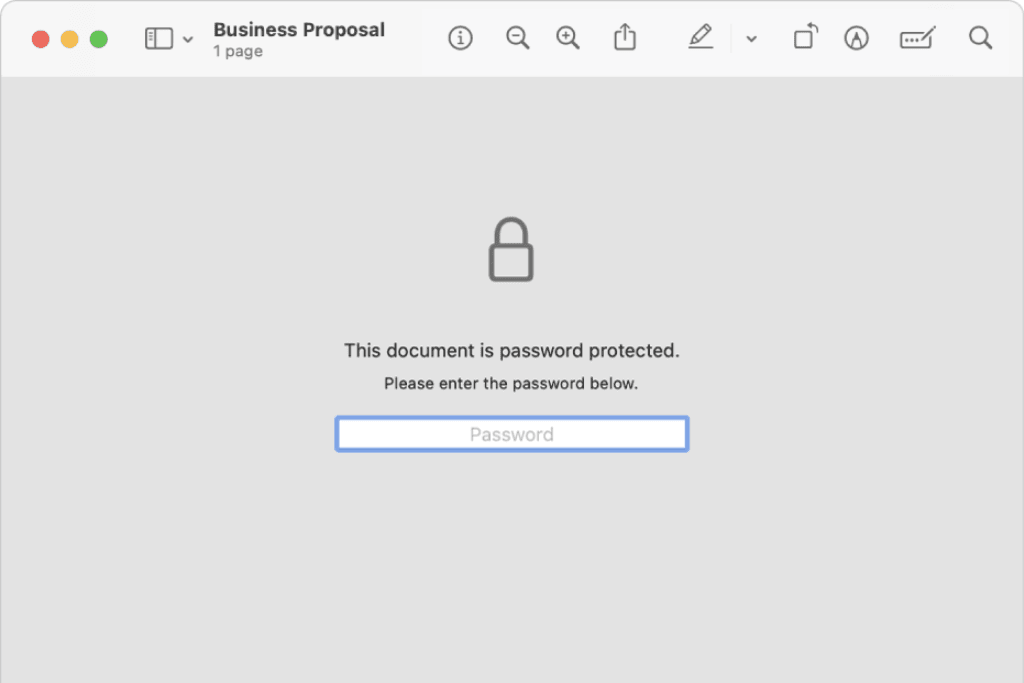
How to Password-Protect Documents on Mac
Trustworthy's Family Operating System® automatically organizes your most important information and turns it into answers, guidance, and action.
Key Takeaways
Mac users can secure confidential documents with built-in password protection tools.
Methods include Disk Utility, Terminal, and third-party apps like Word or Adobe.
Adding encryption adds another layer of protection against unauthorized access.
Combining native protection with third-party apps enhances document security.


If you use your Mac to store and share documents with sensitive or confidential information, your data is at risk of being breached. Cybercriminals are getting more advanced, and their tools are evolving, so you need to be on guard.
By adding password protection to your documents, you take significant steps to secure your documents from unauthorized access. This guide covers everything you need to know about how to password-protect documents on Mac.
How to Password-Protect Documents on a Mac
Here are some easy steps for you to follow to password-protect documents using your Mac's Disk Utility, Terminal and Native Protection.
Password Protecting Documents Using Disk Utility
You can use Mac OS built-in Disk Utility to add password protection to your documents. This is the easiest method to use with additional encryption.
Here's how:
To open Disk Utility, go to the "Applications” menu.
Select "Utilities."
Then, from the sub-menu, select "Disk Utility."
Once opened on the top left of the screen, select "File."
Then, select "New Image."
Select "Image from Folder."
Then, choose the folder you want to add password protection to by selecting "Choose."
Set a location where you want to save the folder before opening the drop-down menu for "Encryption."
Choose your preferred encryption and enter a password.
Select "Choose" to save your password or select the "Key" icon to generate a password.
Open the "Image Format" drop-down menu and select "Read/Write."
Click “Save.”
This will save your folder as a protected disk image with password access.

Password Protecting Documents Using Terminal
The second method to password-protect your documents is to use Terminal. You use a command line to tell your Mac what you want it to do. The process is easy.
Before you begin, save the documents you want protected into a zip file. Then, follow the steps below:
Launch the Terminal app.
Type in the command: zip -er destination source.
After typing the command in, press "enter."
Drag or drop the zip folder into the Terminal.
Select "Enter."
Enter your password, and then select "Enter."
Verify the password by retyping it, and then select "Enter."
Your protected file gets added to a zip archive, and you need a password to open it.
Password Protecting Documents Using Native Protection
You can password-protect your files using built-in Mac tools, however, this method only works for native apps like Apple Notes, Pages and Numbers. This method is very easy to use.
Here's how to do it:
In either the Apple Pages, Numbers or Keynote app, select "File” from the top left.
Select "Set Password."
Enter the password.
After typing in the password, select "Set Password."
If you want to use the Notes app, here's how to lock the note:
Open Notes.
Right-click on the note you want to lock and select "Lock Note."
Enter a password.
After choosing your password, select "Set Password."
How to Encrypt Documents on Mac
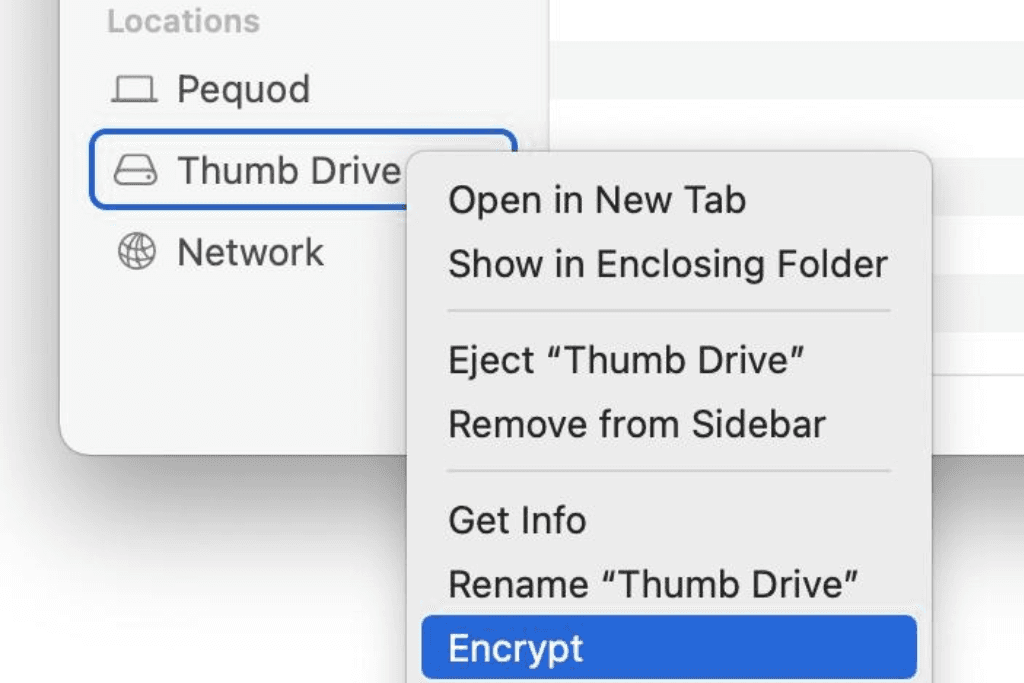
Password protection is only one layer of defense for your documents. While recommended, it’s not the strongest document security method. We also recommend encrypting your document, as this is a more advanced type of security.
Before you begin, ensure your MacOS is up to date. If not, run an update.
Here’s how to encrypt your document:
To begin, use the Finder feature to open a new window.
Control-click the item you want to encrypt. This will appear in the sidebar.
From the pop-up menu, select "Encrypt [item name].”
Create a password.
After typing that in, select "Encrypt Disk."
After the encryption process, the only way to open the folder or documents is by using the password, so be sure to keep it in a safe place.
Third-Party Solutions to Password-Protect Documents on Mac
You can use additional methods to password-protect your documents on your Mac if you don't want to use the built-in tools. You can use other third-party tools like Microsoft Word, Adobe Acrobat, Dropbox and DocHub.

Microsoft Word
Microsoft Word is a popular third-party solution for adding password protection to the documents on your Mac, and it’s very easy, too. Here’s how to do it:
Open the Word document.
At the top of the page, select “Review."
Under that sub-menu, select "Protect Document."
The security menu will open, where you need to enter a password.
Once you confirm the password, click "Ok."
Your document is now password-protected.
Adobe Acrobat
This method is free and simple to use. To password-protect your document, save it on your Mac as a PDF. Then follow these steps:
Open Adobe's Acrobat Reader online.
Drag or drop your selected PDF into the box or select the "Select a File" button.
After you add your PDF, type in a password.
You'll need to confirm it.
Select "Set Password."
To download the protected PDF, sign in to your Adobe account.
Dropbox
Dropbox is a popular option for practicing good document control and keeping your documents secure. Using Dropbox is free and very simple.
Here's how to password-protect your files by adjusting the shared link settings:
Open Dropbox.
Hover over the name of the file you want to protect.
Click on the share icon.
Select "Settings."
Select either "Link for Editing" or "Link for Viewing."
Toggle the "Require Password" button to "On."
Set a password and click "Save."
DocHub
DocHub is another alternative you can use to create passwords for your documents on Mac. You'll need to create an account to use this software, but they offer a free trial.
Here's how to use it:
After logging in, select the "Add New" option and select the file you wish to protect.
Following the prompts, add your password.
Once you're happy with the password, click "Done."
How to Ensure Your Password-Protected Documents Are as Safe as Possible

In addition to adding password protection to your documents on Mac, there are some best practices to follow to ensure your documents are as safe as possible.
Create a Strong Password
Set yourself up for success by creating a very difficult password for hackers to break. Choose a long password, aiming for more than ten characters and using numbers, letters, symbols and icons. Avoid using names, special dates or other generic words, as these are easy to hack.
Russel P. Reeder, the CEO of Infrascale, advises:
“There are two common password attacks – brute force and dictionary attacks. Both generally involve a bot, but can also be done manually, and involve trying a sequence of numbers and/or common words like 123456 – hence trying to crack a password using 'brute force' or common 'dictionary' words. To minimize this type of exposure, don’t make your passwords predictable.”
Don't Send the Password and the Document in the Same Message
As convenient as it may be, sending the protected document and the password in the same message is never a good idea. This makes it easier for someone to intercept the document and password. We suggest sending the password in another message or even sharing the password in person.
Frequently Asked Questions
Can you password-protect PDFs on Mac?
Yes, by using the Preview App on Mac and opening a PDF. Select 'File" and choose "Edit Permissions." From there, follow the prompts to set a password.
How do I password-protect my documents?
You can password-protect your documents with MacOS built-in tools or other third-party solutions like Microsoft Word, Adobe Acrobat and Dropbox.
Can you put a password on a folder on Mac?
Yes, you can. We recommend using Disk Utility or Terminal on your Mac device.
How do I password-protect a folder on a Mac without Disk Utility?
Use Terminal to run the command line, zip -er destination source. Then, enter and drag your file in to set the password.

We’d love to hear from you! Feel free to email us with any questions, comments, or suggestions for future article topics.